

PCG Graph- Populating a simple forest- Unreal 5.4.
PCG in Unreal is seriously one of the coolest tools added to Unreal in the past few years, and it’s quickly become one of my favorites. Procedural Content Generation (PCG) is basically Unreal’s built-in system that lets you automatically generate things like foliage, props, buildings, and more—without destroying anything you’ve already built. It’s fast, flexible, and non-destructive.
In this post, I’m walking you through how I set up a basic PCG Graph to create a simple forest by scattering trees across a landscape. This was actually one of the first things I tried when I started learning PCG, and it’s a great beginner-friendly project to get the hang of the system.
I’ve dropped my personal notes below from when I was figuring it all out. And don’t worry—if you start feeling lost, I’ve also broken the whole process down into super simple steps that you can follow easily.
On top of that, I added a little bonus: I show how to build a second graph to spawn stumps and logs with mushrooms. I’ve got a step-by-step guide for that too. The setup is almost the same as the trees—the only difference is that instead of spawning on the landscape, we’re placing the assets directly on the surface of a mesh.


Setup
Before jumping into the graph:
Make sure PCG Plugin is enabled:
Go to Edit > Plugins and search for “PCG”.
Enable the Procedural Content Generation Framework and restart the engine.
In your Content Browser:
Right-click > PCG > PCG Graph to create a new graph asset.
Name it something like PCG_Forest.
Create a new PCG Volume in your scene:
From the Place Actors panel, drag in a PCG Volume into your level.
Assign your newly created graph to the PCG Volume by selecting it and setting the “PCG Graph” property in the Details panel.
Building the Main Graph
Open your PCG Graph and follow these steps:
Start with the Input Node
Every PCG graph begins with the PCG Spatial Input node. This takes the shape of the PCG Volume and feeds it into the system.Add a Surface Sampler Node
Drag off the output of the Input node and add a Surface Sampler node.
This will generate points based on the landscape surface within your PCG Volume.
You can adjust density here (points per square meter) depending on how dense you want your forest.
Add a Static Mesh Spawner
Next, connect a Static Mesh Spawner node to the sampler output.
Choose your tree mesh under the Template Static Mesh field.
You can also enable mesh variation here by using a list of meshes if you want multiple tree types.
Optional: Add Transform Modifier Nodes
Use Transform or Random Rotation/Scale nodes to add variation to each tree.
This helps avoid visual repetition and creates a more natural look.
Connect to Output Node
Finally, connect everything to the PCG Render Output node.
Save and compile your graph.
Preview the Result
Back in your level:
With the PCG Volume selected, hit “Generate” in the Details panel.
You should now see your trees procedurally scattered within the volume.
You can adjust the volume shape, graph parameters, or mesh settings anytime and simply regenerate. It’s non-destructive, so feel free to experiment.
Tips :
Use slope or height filters to limit trees on steep cliffs or underwater.
Add falloff masks or splines to leave space for paths, rivers, or clearings.
Use LOD-friendly tree assets for better performance at scale.
Pair with grass/rock layers using Runtime Virtual Textures for even more realism.
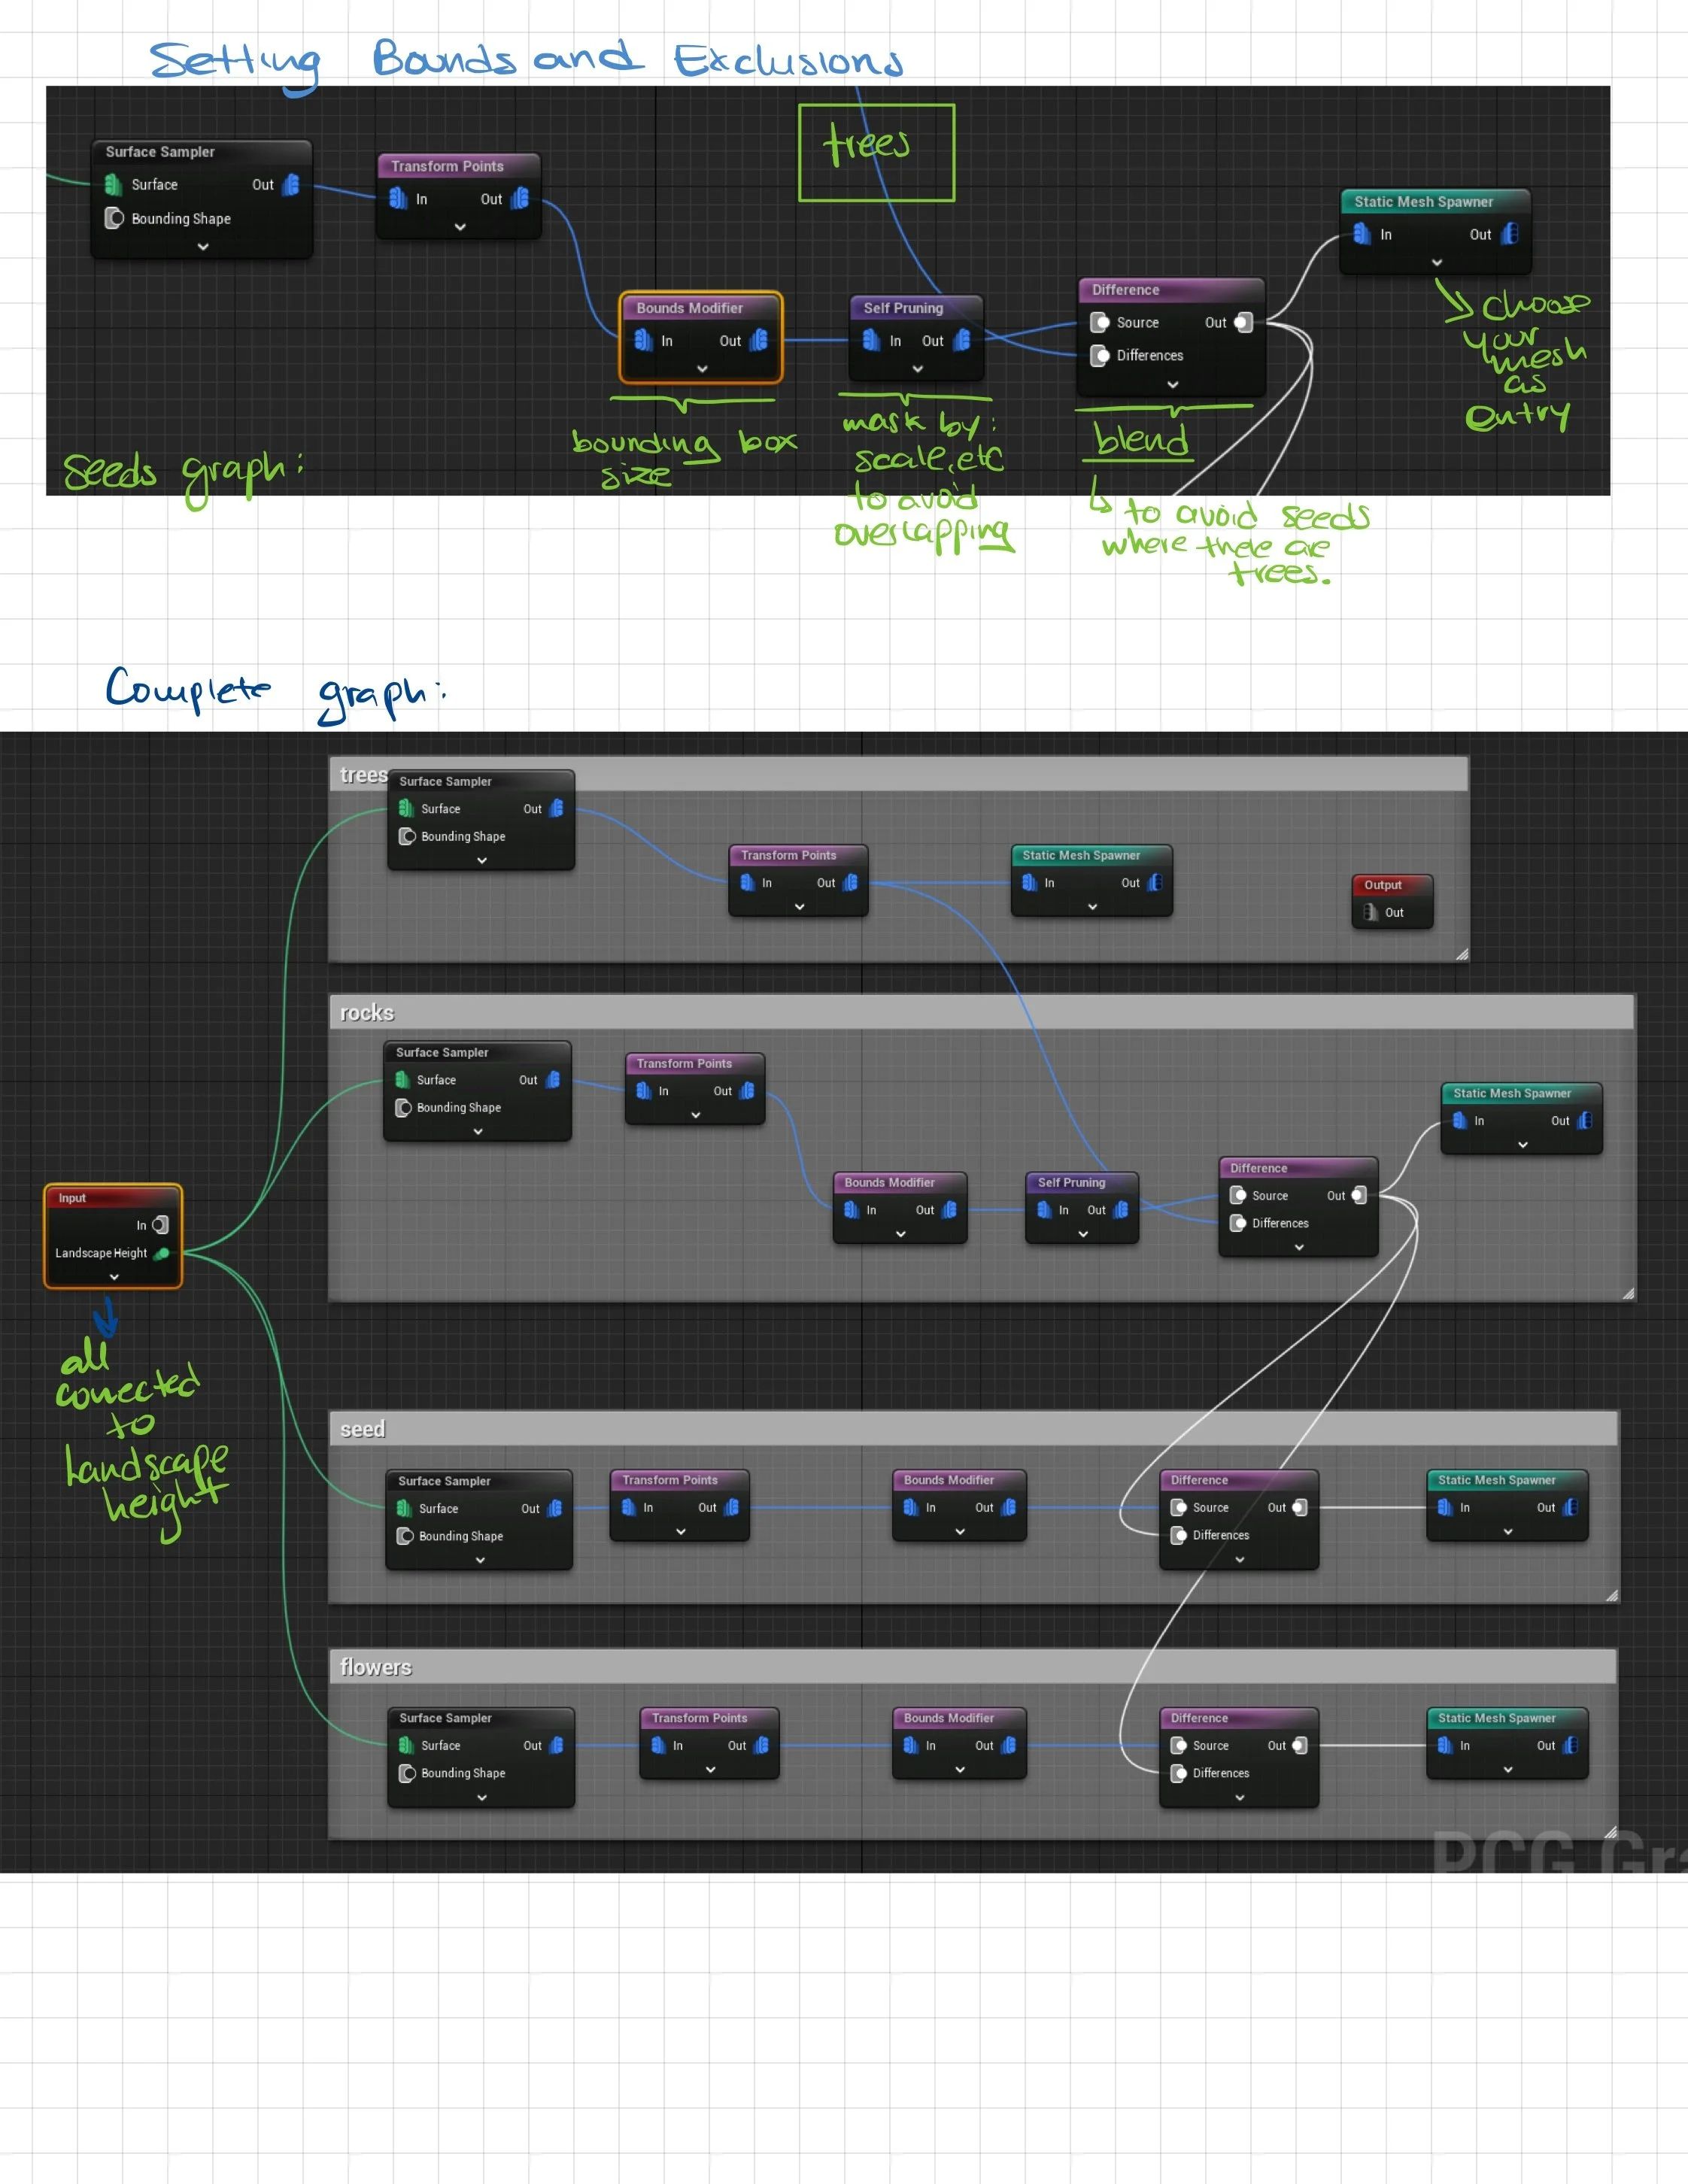
That’s it for the basics! I have repeated this same logic to add not only trees, but rocks and flowers.
Building the Subgraph:
Besides scattering trees and foliage, I wanted to add a small detail: mushrooms growing on stumps scattered around the forest. Instead of cluttering the main graph, I made this clean subgraph that we can plug into the bigger PCG_Forest graph later.
Here’s how I built it step-by-step, but before start, we need this assets:
A 3D model of a stump (our base mesh).
A couple of mushroom models (for variety).
The existing PCG_Forest graph
Create Your Subgraph
Right-click in the Content Browser → PCG Graph → Name it something like
Subgraph_StumpMushrooms. (I named mine as logs with mushrooms, not the best name so Im changing it her in the documentation haha :P )
Set the Subgraph Input (We’ll feed in stumps later)
Inside the subgraph, drag in a "Graph Input" node (this acts as the input connector when we use it inside the main graph).
Think of it like a socket waiting for data (in this case, stump meshes).
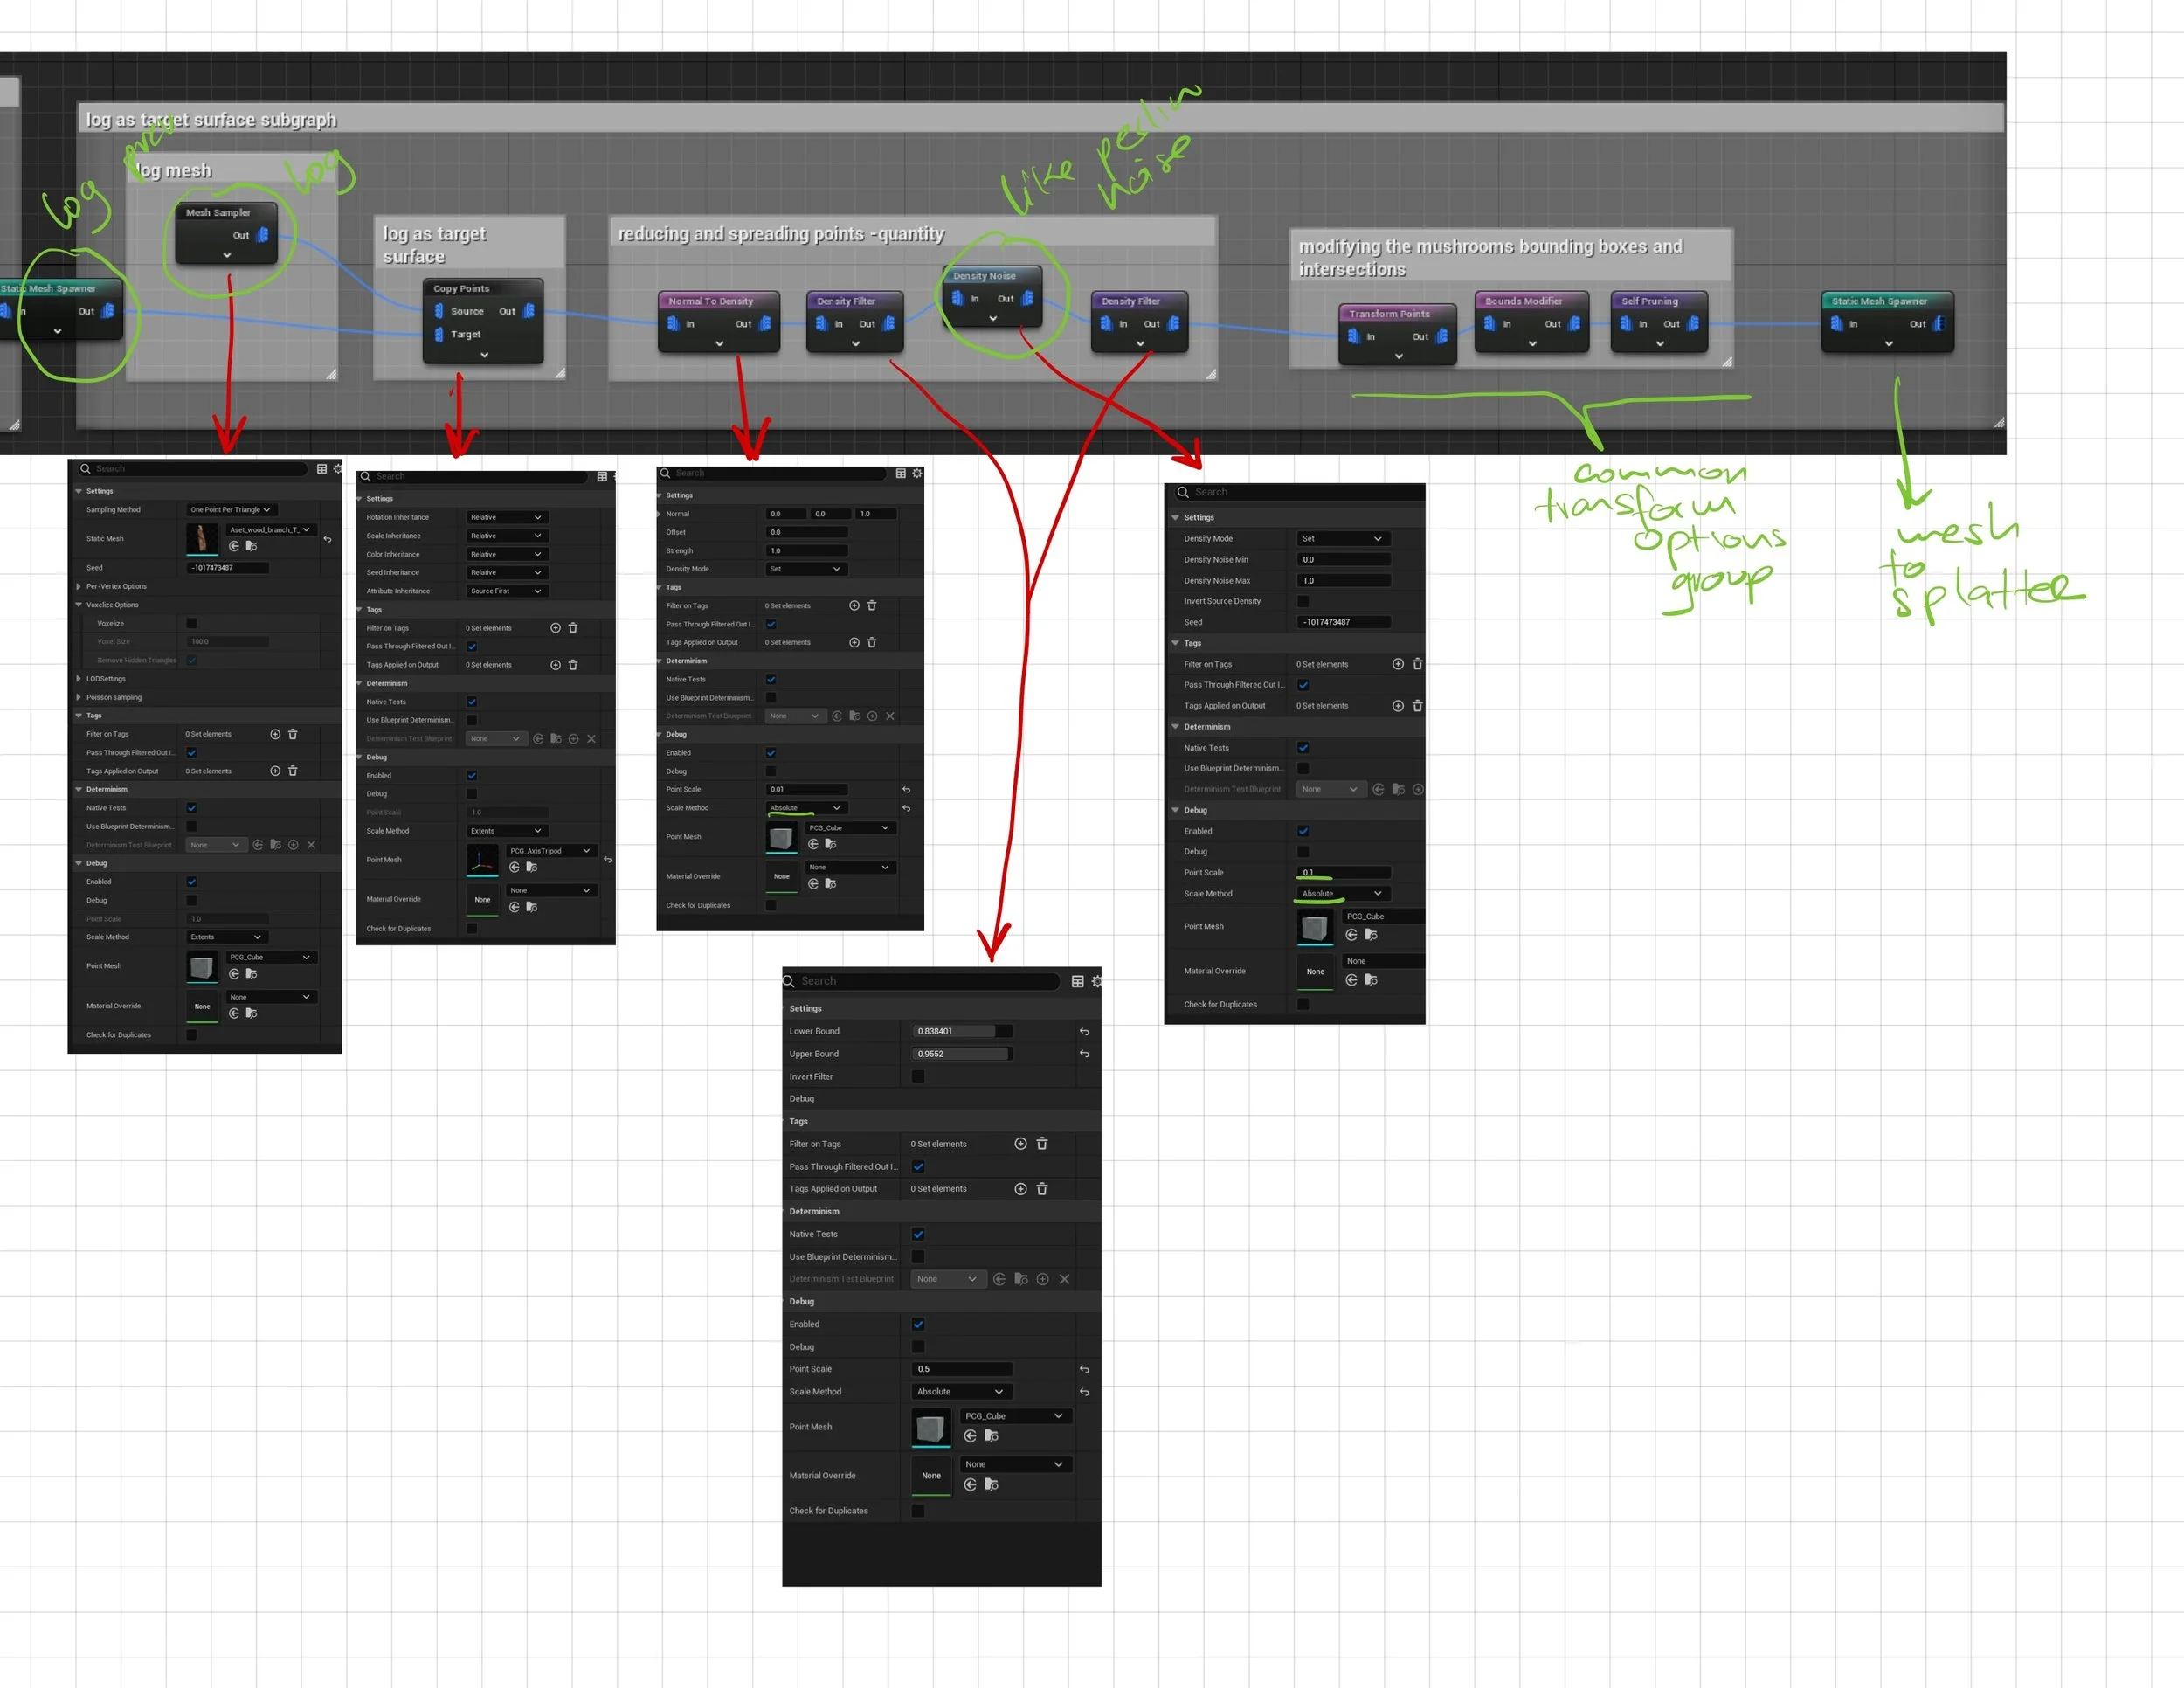
Sample Points on the Stump Surface
Add a "Surface Sampler" node and connect it to the Graph Input.
Set Point Density — try something like 0.2 to start (this controls how many mushrooms spawn on each stump).
(Optional but recommended) Filter for Top Surfaces Only
Add a "Filter by Normal" node between the Surface Sampler and Spawner.
Configure it to select surfaces where normals point mostly upward (Z axis).
This ensures mushrooms spawn naturally on top surfaces, not the sides or bottom.
Spawn Mushrooms on Points
Add a "Static Mesh Spawner" node after the Filter by Normal.
Under Meshes, add your mushroom models.
Enable Random Rotation and Scale Variation to make the mushrooms look natural.
Set Graph Output
Finally, add a "Graph Output" node and connect it to the Static Mesh Spawner.
This makes the subgraph output ready to use inside your main graph.
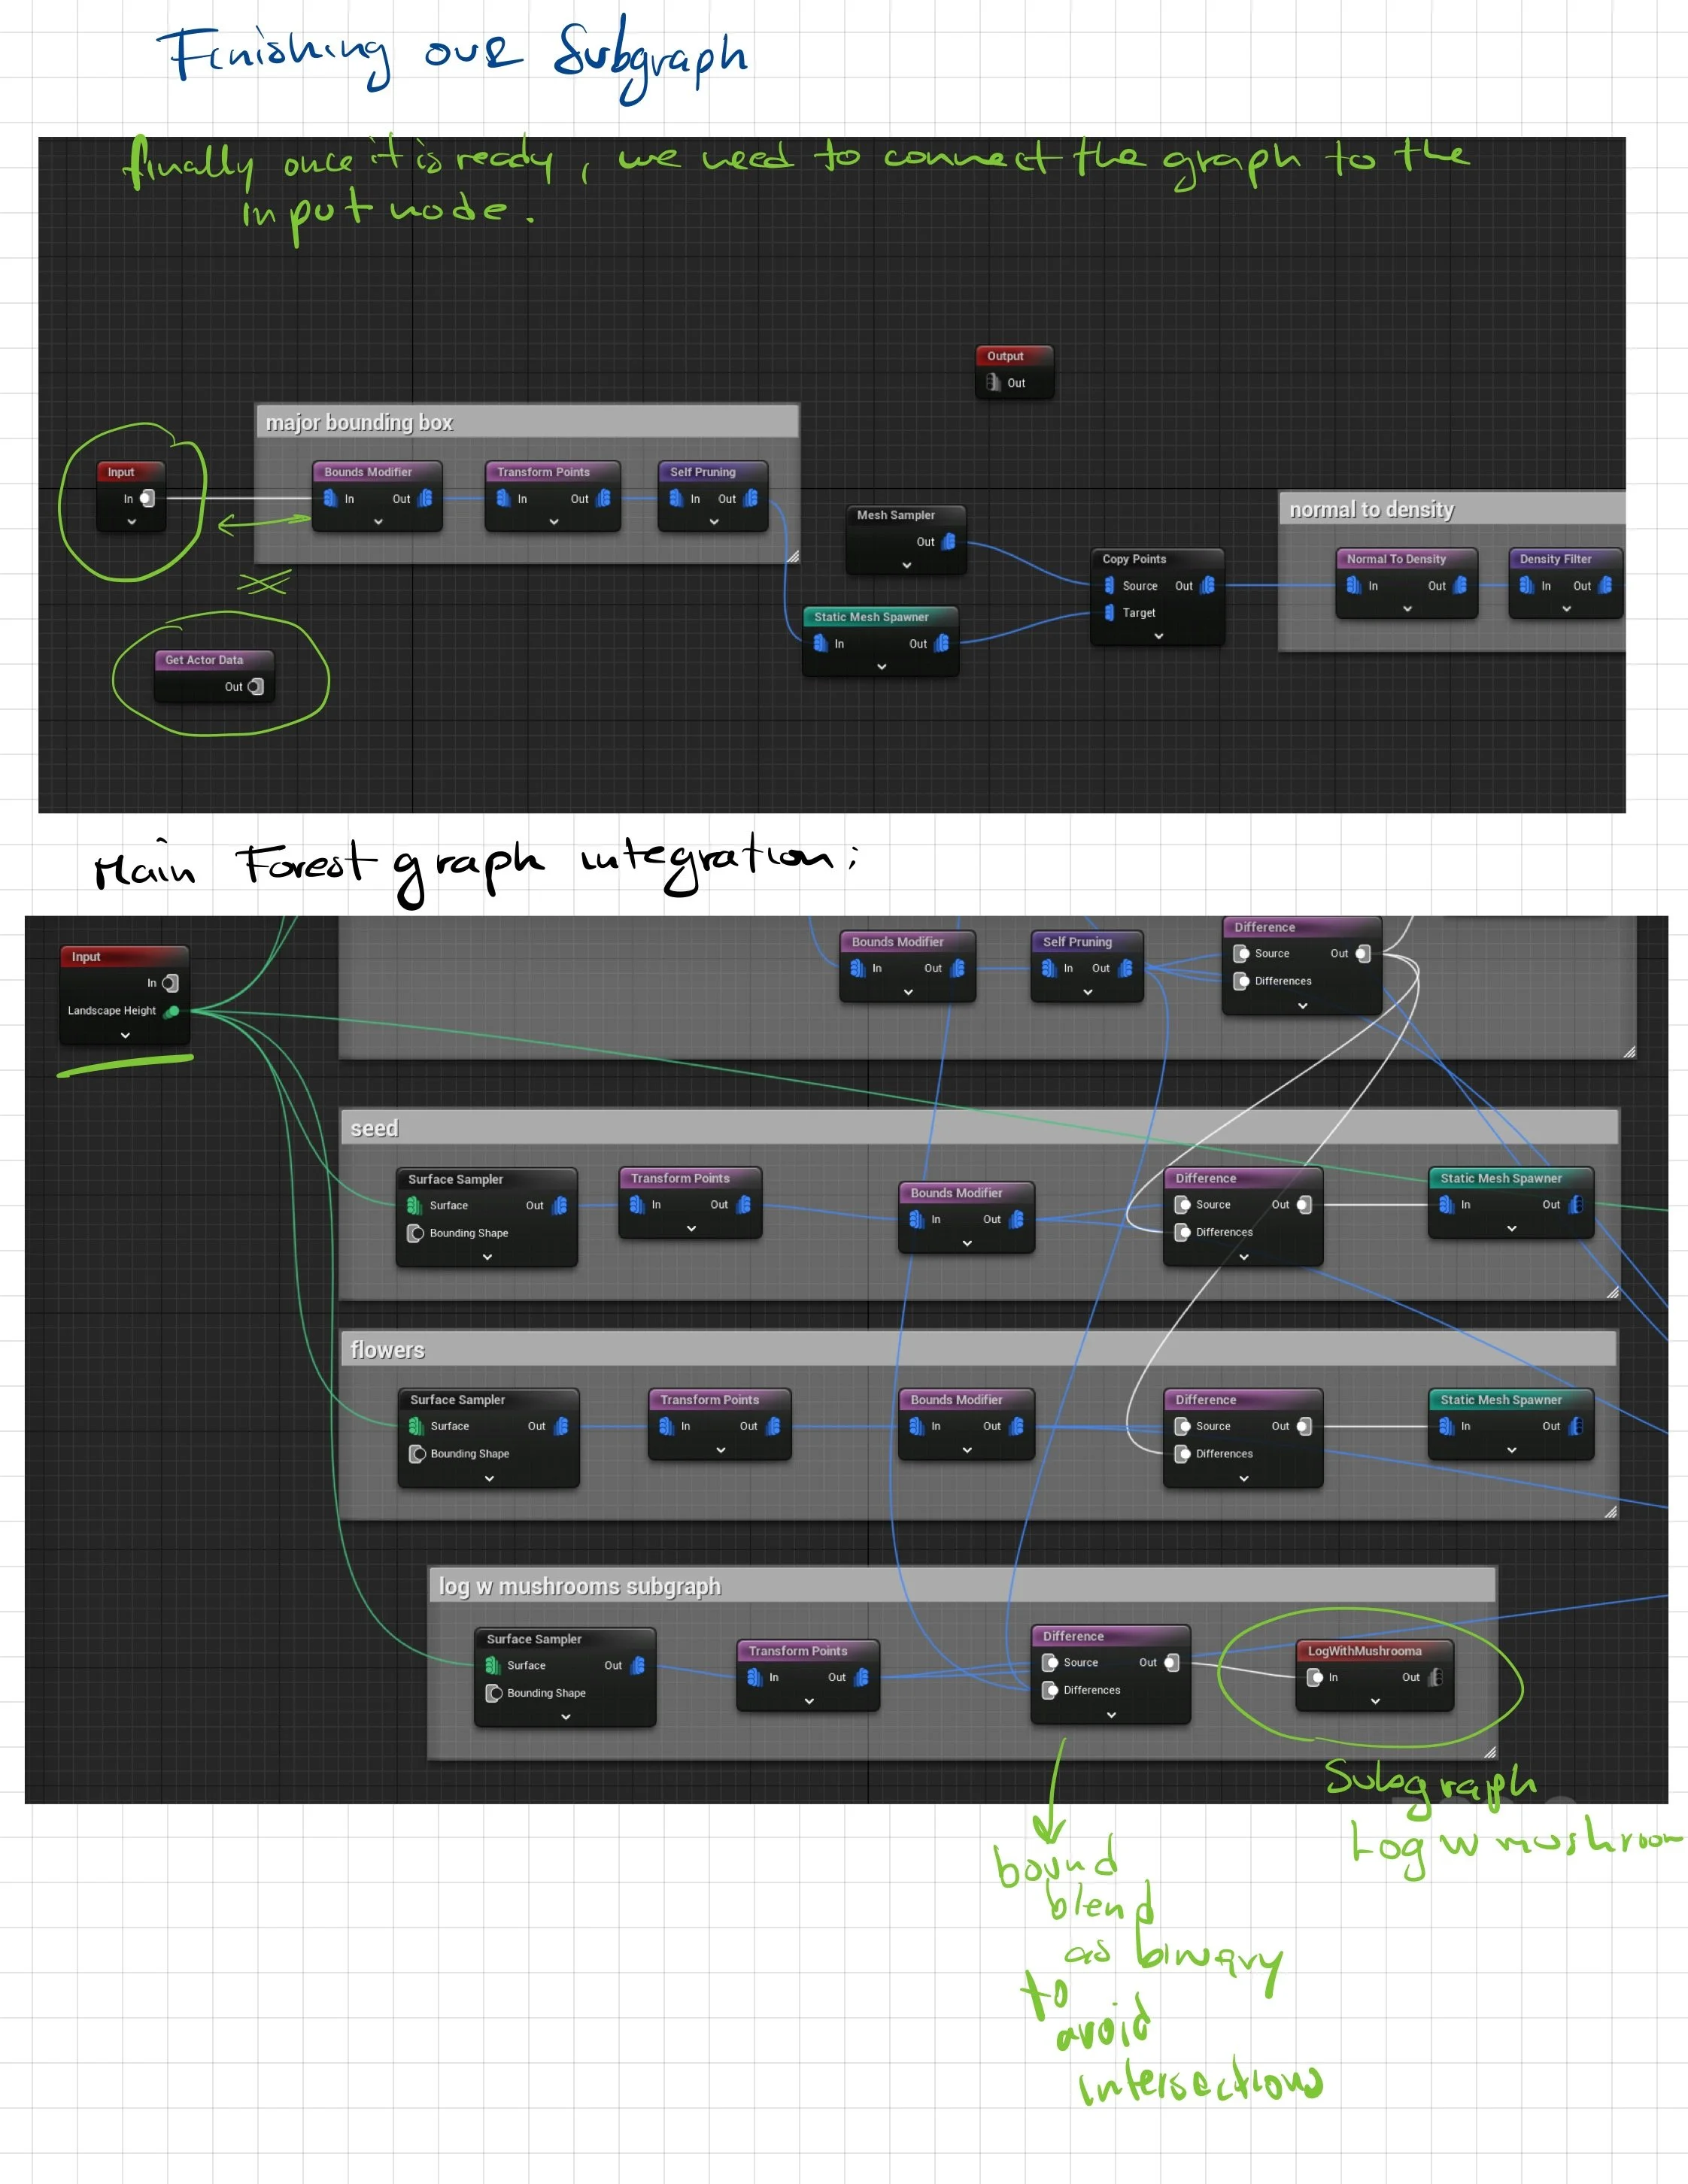
Plug It into Main PCG_Forest Graph
Now we jump back to the PCG_Forest graph:
Find where your stumps are spawned (I’m assuming you have a system that scatters stumps around your forest already).
Right after your stump spawner (or as part of the same branch), add a "Subgraph" node.
Select your
Subgraph_StumpMushroomsin the Subgraph Node’s properties.Connect the stump outputs as the input to the Subgraph node — this feeds your scattered stumps into the mushroom system.
Done! Now, whenever a stump spawns in your forest, mushrooms will automatically be placed on it procedurally.